Showing posts with label recipes. Show all posts

Saturday, January 28, 2017

Recipe Success

I've been killing it on the recipe front lately. Maybe I'm making good choices with my recipe curation or just lucky, but either way, I'm on a roll. And what kind of person would I be if I didn't let that good fortune trickle down to you? So here are my top picks from January--the key here is to follow the recipes as closely as you can, especially when it comes to cooling and chilling times!


Martha Stewart's Chocolate-Flecked Layer Cake with Milk Chocolate Frosting

Oh my goodness, this cake is delicious. The cake itself is very rich, moist, and dense so this one is not for anyone looking for something light. The frosting is a real keeper--though next time I'll reduce the amount of sour cream and replace it with whipped cream. The frosting was a bit too tangy for my personal tastes. I tried this recipe out because I was looking for a good birthday cake. I ended up going another direction for that, but this is a fucking fantastic cake recipe! Tip: cutting the two layers into four is easier than it seems. Choose a long knife, take your time, and slowly rotate the cake as you cut through the layers!


The Great American Baking Show Turkey and Spices Hand Pies with Cheddar Cheese Crust

My boyfriend and I really got into the Great British Baking Show and its sister show across the pond, the Great American Baking Show. Basically, we love Mary Berry, the adorable British lady judge on both shows.

The American version of the show did an episode centered around hand-held pies (think of them as homemade and infinitely superior Hot Pockets). Two of the recipes were standouts to me--but I liked the crust of one and the filling of the other! So I decided to mix and match! Enjoy and if you decide to give these a try, make sure you keep all the ingredients and short crust dough as cold as possible throughout the process. You can also make the turkey filling in advance as it will warm up in the pies when you bake them in the oven! Genius.

Amanda's Turkey and Spices Filling

Stephanie's Cheddar Cheese Short Crust


Tip: to get them to brown beautifully, use the egg wash in the recipe. Also sealing them with milk around the edges keeps them from leaking out their filling while baking!


Cook's Country Thick and Chewy Chocolate Chip Cookies

You guys, I might have saved the best for last with this one. I'm always trying out new chocolate chip cookies recipes because I always want to find the BEST possible one. This might be it. Its' not often you find cookies that bake up just like you do in the recipe book pictures, but came out damn near perfect! The recipe is pretty fool-proof and you don't need a mixer since they use melted butter. I mixed them by hand and they looked amazing.

Here's the recipe (reproduced from the Food For a Year blog)


Ingredients

2 1/8 cups bleached all-purpose flour (10 2/3 ounces)
1/2 teaspoon table salt
1/2 teaspoon baking soda
12 tablespoons unsalted butter (1 1/2 sticks), melted and cooled slightly
1 cup brown sugar (light or dark), 7 ounces
1/2 cup granulated sugar (3 1/2 ounces)
1 large egg
1 large egg yolk
2 teaspoons vanilla extract
1 - 2 cups chocolate chips or chunks (semi or bittersweet) -- I used See's semi-sweet chocolate chips

Instructions

1. Heat oven to 325 degrees. Adjust oven racks to upper- and lower-middle positions. Mix flour, salt, and baking soda together in medium bowl; set aside.

2. Either by hand or with electric mixer, mix butter and sugars until thoroughly blended. Mix in egg, yolk, and vanilla. Add dry ingredients; mix until just combined. Stir in chips.

3. Form 1-2 tablespoons of dough into ball and place on parchment paper-lined baking sheets.

4. Bake, reversing cookie sheets’ positions halfway through baking, until cookies are light golden brown and outer edges start to harden yet centers are still soft and puffy, 15 to 18 minutes (start checking at 13 minutes). (Frozen dough requires an extra 1 to 2 minutes baking time.) Cool cookies on cookie sheets. Serve or store in airtight container.

Happy Baking!


Wednesday, March 05, 2014

Stuff It

I think I am creating a new snow day tradition. On the last snow day, I experimented with low calorie pancake recipes. This time around, it was french toast.

From now on, snow days = new breakfast recipes. This might be one of the best ideas I have ever had.

Blueberries were on sale at the grocery store the other day; two containers for $5. It was too good an offer to pass up and I like blueberries in my oatmeal, so I ended up with a LOT of blueberries. But I'm not sure even I could eat enough oatmeal to use all the blueberries before they went bad, so I decided to look up some recipes to use them.

(enter the blog Skinny Kitchen, stage right).

Let's see....stuffed blueberry french toast? Hmm. I'm not usually big with the french toast. Not sure why, pancakes just always seemed to hit the spot for me more. Maybe it's a texture thing. *scanning recipe* This one has potential though....I think I have almost all the ingredients on hand....and getting a big serving for 166 calories is not bad all...I think I will give it a try!

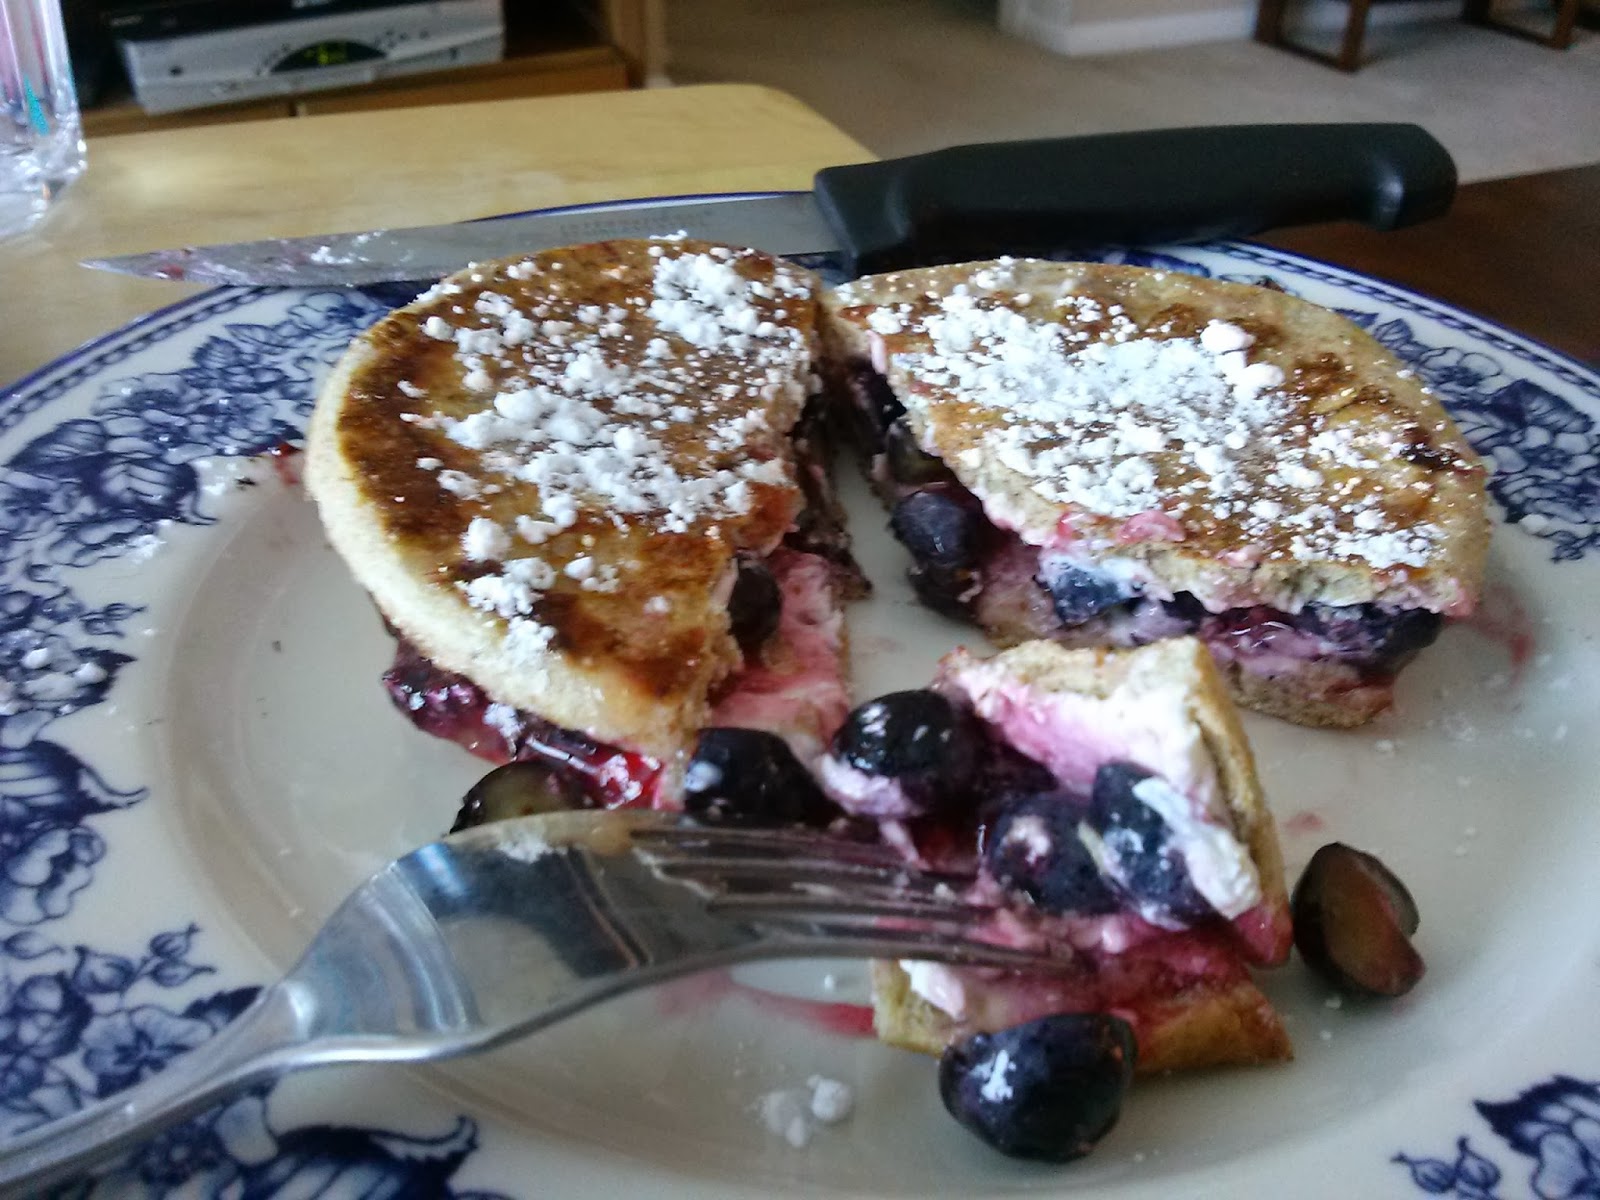
And thank goodness I did, because holy moly, these things are delicious. It's a very simple recipe--you essentially make a cream cheese and blueberry sandwich and then fry it up a bit in a pan. What keeps it low calorie are the details: a sandwich thin instead of regular bread, no sugar blueberry jam, no fat cream cheese, and an egg white. You still get the juxtaposition of the crunchy coating of the bread with the savoriness of the cream cheese and sweetness of the blueberries. And it's so sweet from the blueberries (and the optional dusting of powdered sugar), you don't even need any syrup.

The finished product: weighing in at 166 calories and 9 grams of sugar which makes this is a MUCH better option than standard french toast. Skinny Kitchen includes the stats for full-fat and calorie versions of her recipes, and at IHOP the french toast will set you back 830 calories and 51 grams of sugar. Ouch.

Assembling the french toast "sandwich." You just spread cream cheese on both sides of the sandwich thin and top with sugar free blueberry jam and 1/4 cup blueberries. After coating it in an egg white and frying it up for about 3 minutes per side...you have delicious crunchy, creamy, and blueberry syrupy french toast.


 Are you hungry yet? I also had a scrambled egg and egg beaters (I need the protein to feel full) and my breakfast was still less than 300 calories!


Skinny Blueberry Stuffed French Toast

(NB: this recipe and the ingredients list are for two french toast sandwiches. I halved it to make just one).

2 whole wheat sandwich thins
2 tablespoons fat free cream cheese
2 teaspoons reduced sugar blueberry preserves (I used sugar free jam since that's all I could find)
½ cup fresh blueberries or frozen and thawed, sliced in half
1 egg white
1 teaspoon reduced-fat butter or Smart Balance Light spread
1/2 teaspoon powdered sugar (optional)

1. Spread the bottom inside piece of each sandwich thin with 1 tablespoon cream cheese. On top of cream cheese, spread 1 teaspoon blueberry preserves on each. Place ¼ cup sliced blueberries on top of preserves on each. Top each with the remaining sandwich thin to create a sandwich.

2. Add the egg white to a shallow bowl. Dip both sandwiches into the egg white, making sure to coat both sides.

3. Coat a large nonstick pan with cooking spray. Melt 1 teaspoon reduced-fat butter and swirl around bottom of pan. Add 2 sandwiches, cook about 2½ to 3 minutes on medium-high heat, until golden brown. Using a spatula, turn over and cook the undersides for about 1-2 minutes, until golden brown.

4. Sprinkle top of each with powdered sugar. Plate each and serve with a fork and knife.

Makes 2 servings (each serving, 1 full sandwich)

1 stuffed French toast sandwich = 166 calories, 2g fat, 9g protein, 31g carbs, 6g fiber, 370mg sodium, 9g sugar

Tuesday, February 18, 2014

Snow and Pancakes

It wasn't supposed to be like this. I was supposed to be relaxing in Los Angeles with my mom, brother, sister-in-law, and adorable two year-old nephew. There was going to be sunshine, temperatures in the 70s, a Scottish festival at the Queen Mary, and hanging out with my awesome LA friends on Saturday night.

Instead? There was snow. Lots and lots of snow. Well, lots of snow for the DC area. When a large storm from the South roared into town on Wednesday night, I knew the writing was on the wall for my Thursday morning flight. So it was not a surprise when I got an email from my airline telling me the flight was cancelled and all the other flights on Friday and Saturday were full.

So here, I am. Day 4 of my unplanned staycation.

I did surprisingly well finding things to fill my time. I don't think I've ever ended up with a holiday weekend at home with NOTHING planned. But Thursday and Friday I worked at home (and didn't have to use any leave), and this weekend was full of gaming fun with friends, hitting H street Saturday night, lunches with family, and doing some retail damage at the President's Day sale at Macy's.

And that brings me to today, Tuesday, the last day of my staycation. I've got pretty much nothing planned except catching up on reading, binge-watching House of Cards Season 2, and running some pretty typical errands.

Being at home has also had the added benefit of allowing me time to try out some new recipes, specifically, pancake recipes. Maybe it's the cold weather or all the snow, but for some reason, I have been hankering for some pancakes. But as you all know, I have been trying to stick to a healthy low calorie diet and big, fluffy, carby pancakes aren't really part of the plan.

Good thing there's the internet! During the past few days I have tried out two new low calorie pancake recipes, with mixed results. First was a Snickerdoodle Pancake recipe from one of my new favorite blogs, Chocolate Covered Katie. I don't know how she does it, but this chick makes dessert recipes that are low calorie and packed with good things like fiber and protein.

Most things I have tried from there have been very good, but the snickerdoodle pancakes I would have to rate as just so-so. Don't get me wrong, they were tasty, but not very snickerdoodle-y. But that could be my fault since I replaced the sugar in the recipe with just a teaspoon of Splenda. So it's possible I needed more sweetener.

The recipe cooked up three nice-sized pancakes! I missed the actual Snickerdoodle taste and the texture was a little off, but overall it wasn't bad.

With a quarter cup of sugar-free syrup, these weighed in at 300 calories. I used regular all-purpose flour, 1 tsp of Splenda, and light soymilk. 

If you are familiar with diet-friendly pancakes, then you probably know that they tend to have a slightly different texture than regular pancakes. They are denser and not as sweet (obviously), and these ended up a bit sticky--they were cooked all the way through, but just kind of sticky. Still, they helped scratch the pancake itch!

My second recipe was much more successful. Y'all know I am a huge fan of the Hungry Girl recipes, and I found her basic pancake recipe (Perfect Pancake Duo) in a past daily email. I love that you get two big pancakes out of it and the nutritional info is for the entire recipe. So you can eat all that you cook and not feel like a glutton. The only change I made was adding a half cup of blueberries which ended up being plenty. But then, I love blueberries.


These cooked up really nicely--they needed to stay on the griddle/pan for a little longer than your standard pancakes, about two to three minutes per side. But they cooked up thick with a nice "crust" on the outside and soft inside. Overall? It was a winner and by new go-to pancake recipe!


I'm kind of strange and cut up my pancakes completely before pouring syrup on them. I find it lets them soak up more of the syrup! You can also see all the blueberries in these two pancakes;I think next time I will add more cinnamon as well.

With the addition of the blueberries and sugar-free syrup, these stacked up (get it?) at 262 calories. Not. Too. Shabby. Recipe below!

Hungry Girl Perfect Pancake Duo 

Ingredients

1/3 cup whole-wheat flour
1/2 tsp. baking powder
1 no-calorie sweetener packet (like Splenda or Truvia)
Dash salt
1/4 cup fat-free liquid egg substitute (like Egg Beaters Original)
1/8 tsp. vanilla extract
Optional: cinnamon and half cup blueberries

 Directions

In a medium bowl, mix flour, baking powder, sweetener, and salt. If you like, add a dash of cinnamon. Stir in egg substitute, vanilla extract, and 1/4 cup water. Bring a skillet sprayed with nonstick spray to medium-high heat. Add half of the batter to form a large pancake. Cook until pancake begins to bubble and is solid enough to flip, about 2 minutes. Gently flip and cook until both sides are lightly browned and inside is cooked through, 1 - 2 minutes. Plate your pancake. Remove skillet from heat, re-spray, and return to medium-high heat. Repeat with remaining batter to make a second pancake. Enjoy!

Nutritional Information

Entire recipe (2 pancakes): 180 calories, 1g fat, 515mg sodium, 32g carbs, 5g fiber, 1g sugars, 11.5g protein -- PointsPlus® value 4*

Monday, December 30, 2013

Total and Complete Cookie Domination

Ah, the holidays. There are many things to love about them: the brisk air and chance of snow, reconnecting with friends and family, all the lights and decorations....but come on. We all know what the best part is: THE COOKIES.

Every year, I host a cookie swap. It has gotten...shall we say, larger as the years go on, and this year I think we might have finally outdone ourselves. Squeezing 25 people into my one bedroom apartment is something of a challenge, but my god, the cookies. We had about 30 types of cookies and it was a beautiful thing.


Table #1 at the swap (as much of it as would fit in the camera frame)...

...and table #2, complete with gingerbread house centerpiece!

In case you are unfamiliar with a cookie swap, it's pretty simple. Every person bakes a large batch of one type of homemade cookies. Everybody's cookies are placed on a table and then you walk around with an empty container and fill it with all different types of cookies. So you come in to the swap with one type of cookie and leave with dozens and dozens of different types! Your holiday baking = done.

Your waistline = huge, but that's a post for another day. This is the holidays and even I allow myself some indulgences.

We had an amazing spread this year; several people brought more than one type of cookie so the tables were practically groaning from all the cookie goodness. But that's what you want from a successful swap: lots of cookies, smiles, and laughs and we had all that in spades.

So what did I make? I decided to try some new recipes this year. First, I wanted something a little more standard for the holidays, and this Peppermint Meltaways recipe from the Cooking Channel website looked fun (full recipe below). It's a crumbly shortbread style cookie with a Hershey chocolate kiss hidden in the middle. You then roll the cookie in powdered sugar and crushed candy canes. Yum!

For my second cookie, I decided to try something a little more unusual. There were more boys than usual planning to attend the swap, so I thought something using bacon might be fun to try. Bacon is also a big trend in baking right now, and hello, it's bacon. So when I came across this Candied Bacon and Dark Chocolate Chunk Cookie recipe, it seemed perfect. All in all, I think they came out pretty splendidly. And when I caramelized the bacon in the oven it made the entire house smell AMAZING.

More pictures, links, and recipes for cookies I have made this holiday season below. You've only got two more days before those New Years resolutions kick in, so happy baking!


Peppermint Meltaways

1 cup powdered sugar
2 sticks unsalted butter (1 cup), softened
1/4 teaspoon peppermint extract
2 cups all-purpose flour
1/8 teaspoon salt
1/2 cup finely crushed peppermint candies or candy canes
24 chocolate Hershey's Kisses

Preheat the oven to 350 degrees. In a large mixing bowl with an electric mixer, combine 1/2 cup of the powdered sugar and the butter and mix until light and fluffy. Add the peppermint extract and mix to combine. Next, slowly add the flour and salt, mixing until just combined. In a separate mixing bowl, combine remaining 1/2 cup powdered sugar and the peppermint candies. Roll the dough into twenty-four 1 1/2-inch balls. Insert 1 chocolate morsel into each ball and re-roll to ensure that the cookie dough encases the chocolate. Next, transfer to the bowl with the powdered sugar and crushed candies rolling each to coat. Place the balls on an ungreased baking sheet, spacing them about 1-inch apart. Bake until they start to turn golden brown on the bottom, about 20 minutes. Remove and transfer to wire cooling rack. Cool until they are just cool enough to handle, 5 minutes. Return the cookies to the bowl with the powdered sugar and crushed candies and toss gently until each cookie is coated.


Candied Bacon and Dark Chocolate Chunk Cookies

CANDIED BACON:
8 strips applewood-smoked bacon
1/4 cup raw sugar
1/4 teaspoon cayenne pepper

COOKIES:

1 3/4 cups unbleached all-purpose flour
1/2 teaspoon baking soda
1/4 teaspoon fine sea salt
3/4 cup melted unsalted butter, at room temperature
3/4 cup raw sugar, pulverized
2 egg yolks
1 to 2 teaspoons maple extract
1 cup dark chocolate, chopped

For the candied bacon: Preheat the oven to 400 degrees F. Line a cookie sheet with parchment paper, and set it aside. Lay the bacon strips in a single layer on a wire rack, and coat the tops completely and evenly with the raw sugar. Lightly press the sugar into the bacon strips, sprinkle them with the cayenne, and transfer the rack to the lined cookie sheet. Bake for about 12 minutes, or until the bacon is deep red and very caramelized. Check on the bacon frequently; the cooking time may vary depending on the thickness of the bacon. Use tongs to remove the candied bacon from the baking sheet, and transfer the slices to a wire rack to cool completely. Once cooled, roughly chop.

For the cookies: With the oven rack in the middle position, preheat the oven to 325 degrees F. Line 2 cookie sheets with parchment paper. In a bowl, combine the flour, baking soda and salt. Set aside. In another bowl, combine the melted butter, brown sugar, egg yolks and maple extract with a wooden spoon, until the mixture is well blended. Stir in the dry ingredients and the dark chocolate chunks. With a spoon, drop 2 tablespoons of dough per cookie onto the baking sheets, leaving 2 inches between each cookie. Flatten lightly with your fingers, then press your thumb down the center of each cookie to make a slight indent. Add a tablespoon of chopped candied bacon to the center of each cookie. Bake for 11 to 12 minutes. Let cool on the baking sheet for a few minutes then transfer to a cooling rack. The cookies will be a bit soft but will firm up when cooled and become chewy. For crunchier cookies bake for 15 minutes, taking care not to burn the bacon by covering the cookies loosely with aluminum foil.


My grandmother's puffy and silky Ricotta cookies (from my cookie swap blog post last year).

The best cookie ever: Andes Chocolate Mint Cookies (originally from Cook's Country, but reproduced on my blog).


Bonus cookie porn from my work cookie swap: the aftermath!


Friday, November 22, 2013

Turkey Hash Patties

The eternal question: what to do with all those Thanksgiving leftovers? I confess that I have never been particularly adventurous when it comes to leftovers, I typically just put everything on the plate as it was originally served and then heat it up in the microwave. Exciting, right?

But this year, I have decided to try some new recipes. I've been trying to be more adventurous with my cooking all year long and the holidays are certainly no time to drop the ball. This past weekend presented the perfect opportunity when my friend Selvi hosted her annual "Friendsgiving" dinner. A whole bunch of us get together for a Thanksgiving potluck and bring donations to the charity, SOME. Giving money to a charity dedicated to helping hungry folk makes us all feel slightly better about stuffing our faces.

 The spread at the first table at Friendsgiving.

This year, I came prepared. I brought some tupperware so I could take home some of the yummy leftovers. Especially Selvi's curry mashed potatoes, which I swear to god, were the best mashed potatoes I have ever eaten. I ended up with two tupperware containers bursting with roast turkey, curry mashed potatoes, and steamed broccoli. But what to DO with it?

While on a plane recently, I was reading O magazine (...what?) and I came across the answer. Turkey Hash Patties! The recipe is super easy. You chop up your leftover turkey, a green veggie (the recipe called for green beans, but I had broccoli), onion, and combine it all with the potatoes. You can form the mixture into patties and fry it in some oil on your stove top.

I was a little surprised by the texture of these; they ended up...I don't know, mushier than I had expected. I'm not sure what I was thinking though, I mean they are held together by mashed potatoes which aren't exactly solid. The good news is, they were delicious! All the yummy flavors combined and with the spices in the curry mashed potatoes it was just fantastic. And like I said, they were super easy.

I wasn't able to find nutritional information for the official recipe, but I put the ingredients (including the oil you use for the frying) into the My Fitness Pal recipe calculator, and it indicated the patties were about 170 calories each. They're a good size--two of them made a hearty dinner, so that doesn't seem too bad.


The finished product! They may not look like much, but trust me, they were delicious.

And now the good stuff, the recipe!

(I made some changes when I cooked these. As noted above, I used broccoli instead of green beans and I left out the salt and pepper--there was definitely enough seasoning in the curry mashed potatoes. If you are using regular mashed potatoes, I would recommend throwing in whatever seasoning strikes your fancy, maybe some garlic, curry powder, paprika, basically anything could work)

O Magazine Turkey Hash Patties

Ingredients
  • 2 Tbsp. vegetable oil
  • 1 small red onion, chopped
  • 1 1/2 cups roast turkey, finely chopped
  • 1 cup cooked string beans, cut into 1/4" pieces
  • 3 cups mashed potatoes
  • 1/4 tsp. salt
  • 1/4 tsp. pepper
  • Fresh parsley (to garnish)

Directions

Active time: 20 minutes
Total time: 30 minutes
 

In a nonstick skillet, heat 1 Tbsp. vegetable oil over medium heat. Add red onion and cook until soft, about 4 minutes. Transfer to a bowl with roast turkey, string beans and mashed potatoes. Season with salt and pepper and form mixture into 8 patties. Heat 1 Tbsp. vegetable oil over medium-high heat. Cook patties until golden, flipping once, about 5 minutes. Garnish with fresh parsley and serve with salad.


The turkey hash patties cooking on the stove.


Monday, November 04, 2013

Cupcakes in a Jar

A good friend of mine from college is pregnant and as a way to say congratulations, I thought it would be fun to bake and mail her some cupcakes. Who wouldn't love to receive surprise cupcakes in the mail? Especially when you are pregnant you basically have carte blanche to eat whatever you want (eating for two blah blah blah).

Of course, mailing cupcakes is something of a challenge. How to send them so they don't end up totally squished with icing everywhere? I considered various packing options (individual boxes? send the cupcakes un-iced?), but nothing really seemed like it would get the job done. So I did what any self-respecting American with a smart phone would do. I went to Google.

Turns out the answer is pretty simple, awesome, and adorable. Bake the cupcakes in jars!

As far as first attempts go, I wouldn't say it was a triumph. But I wouldn't say it was a disaster either. There is definitely room for improvement, but all in all the cupcakes were cute and arrived safe and sound.

It's not that complicated really. Cupcakes in a jar. As advertised.

I used a box spice cake mix (hey, nobody's perfect), and prepared it as directed. I divided the batter between 12 half-pint jelly jars, filling them out about halfway. And that was my mistake; I should have left more room to allow for the cupcakes to rise. Turns our a box of cupcake mix these days makes about 18 cupcakes, so when you only make a dozen....yeah, they are big cupcakes.

 Oops. Too much cupcake in the jar.

Most of the jars were filled to the brim with cake which meant there was no room for icing. I had to scoop out a bunch of the cake and (gasp!) throw it away. Yes, I had to waste precious cake, and trust me it was one of the hardest things I have ever done. But live and learn, right? Next time I can make more cupcakes! 

Oh, and regarding the baking process, you just put the jars on a baking sheet and bake them at 350 degrees for about 18 minutes (or whatever the baking directions are on your recipe or box). To ice the cupcakes, I piped on the icing using a pastry bag and cake decorating tip. I suppose you could spoon it in, but it definitely wouldn't look as nice. I also dyed the icing blue as my friend is having a baby boy. 

After icing the cupcakes and popping on the lids, I put the jars in the freezer for about a day to make sure they were frozen solid. I packed them in a box, wrapping each jar in newspaper, and mailed them out! Easy peasy, lemon squeasy. 

If you're looking for more specific directions or other fun cupcake ideas, check out the blog, Cupcake Project. It's where I got the idea!

Tuesday, October 22, 2013

Going Meatless

I love meat. Well, I love protein, but since I don't like beans or other similar sources of non-meat protein, meat is usually my go-to. But I also understand that too much of a good thing (mmm....animal flesh) is a bad thing. So I have lately been trying to explore more vegetarian-friendly options that will still leave me feeling full and won't cause my arteries to harden.

Now the recipe below, I know I am going to lose many of you with the first ingredient. Namely, Morning Star Soy Crumbles. Yes, it is soy. But it is also delicious.


In case you aren't familiar, the crumbles mimic the flavor and consistency of ground beef, but are made from soy. I decided to pair them with another product I picked up at the grocery story, La Tortilla high fiber tortillas. Mexican food (specifically items in tortillas) are not very diet friendly since those tortillas pack a ton of calories. But La Tortilla brand have only 50 calories each and are low carb and high fiber. So Mexican is back on the menu, boys!*

I decided to go with a classic taco. I cooked up some veggies (peppers and onion) and then threw some of the crumbles in the pan. Some water, taco seasoning, and about 1 minute later I had my taco filling! 


I added some chopped tomatoes for fun, but sadly didn't have any salsa in the house. 


The tacos definitely hit the Mexican spot, but I'm not gonna lie, there was a bit of an aftertaste from the low calorie tortillas. But this is the price you pay to look fabulous, right? Next time I am going to add more taco seasoning and salsa to make a more complex flavor. And I might even throw in some hot sauce to add more kick. 

Total calorie count for both tacos: 200 calories. Seriously, two big tacos for only 200 calories.


*That's a Lord of the Rings movie reference, in case you missed it. 


Wednesday, July 17, 2013

Cooking Light Mini Turkey Meatloaves

Mini things are cute. In fact, I'm pretty sure that mini versions of something are one of Rules of Cute. Which means this meal is not only delicious and easy, it's also adorable.

Well, as adorable as a pile of meat can be.

And when I say it's easy, I mean it's SUPER easy. Can you throw a pile of ingredients into a bowl? Can you use a scoop to put it in a muffin tin? Then you can make this recipe. Sure, it also calls for browning some onion first, but honestly you could probably skip that step (as long as you like your onion a little crunchy).


Seriously, just throw all the shit into a bowl. Easy peasy lemon squeezy.

I'm talking about Cooking Light's mini turkey meat loaves. I came across this recipe while perusing a cookbook owned by a friend. These little meatloaves are packed with protein and flavor and at 142 calories a pop, you can double your portion size to feel extra full without the guilt.

A couple alterations I made to the recipe: I used Italian seasoning breadcrumbs instead of the regular bland kind (you'll find that they pack a lot more of a delicious flavor punch). I also used dried parsley instead of fresh; unless you have a herb garden it's not worth the trouble or expense. Finally, I skipped the step where you brush the top of the loaves with the ketchup mixture; I just dumped the ketchup and hot sauce into the bowl and mixed it all up with the meat and other ingredients.

Oh, and I doubled the recipe to get three meals out of it. But you could easily make up to a dozen of these suckers if you are feeding a crowd.


Mmmm....turkey balls. 

Cooking Light's Mini Turkey Meatloaves

Ingredients 

Cooking spray
1/2 cup chopped onion
3 tablespoons dry breadcrumbs
1 tablespoon chopped fresh parsley
1 teaspoon Worcestershire sauce
1/4 teaspoon salt
1/4 teaspoon dried oregano
1/8 teaspoon freshly ground black pepper
8 ounces ground turkey breast
1 large egg white
3 tablespoons ketchup, divided
1/4 teaspoon hot pepper sauce (such as Tabasco)

Preparation 

Preheat oven to 350°.

Heat a small skillet over medium-high heat. Coat pan with cooking spray. Add onion to pan; sauté 5 minutes or until lightly browned. Remove from heat; cool slightly.

Combine onion, breadcrumbs, and next 7 ingredients (through egg white) in a large bowl. Stir in 2 tablespoons ketchup. Spoon about 1/2 cup meat mixture into each of 3 muffin cups coated with cooking spray; place muffin tin on a baking sheet.

Combine remaining 1 tablespoon ketchup and hot pepper sauce in a small bowl. Brush ketchup mixture over meat loaf tops. Bake at 350° for 30 minutes or until a thermometer registers 165°.

If you double the recipe, you also bake the mixture into one eight by four-inch loaf. Bake time may increase to about 45 to 50 minutes; use a thermometer to check for an internal temperature of 165°.

Sunday, July 14, 2013

Chocolate Chip and Peanut Butter Cookie Dough Bites

A friend of mine (hi, Lisa!), posted a picture and recipe on Facebook the other day of a grain-free, gluten-free, but absolutely YUMMY looking chocolate chip cookie alternative.

I was curious. And hungry.

The recipe uses no flour, no eggs, no oil...but it does use a can of chickpeas and a bunch of chocolate chips. Along with honey, peanut butter, baking powder, vanilla....and that's it! I plugged the recipe into my calorie counter, and it was a bit over 100 calories. Not bad, especially when compared to a normal chocolate chip cookie (which has about 150 calories), but I figured I could do better. Specifically, by using the peanut butter substitute, PB2, which cuts about 85% of the calories from traditional peanut butter.

I made a couple of other tweaks as well. I used half regular PB2 and half chocolate PB2, to try to get some more chocolatey flavor. I also used half chocolate chips and half peanut butter chips...mostly because I have an opened bag of peanut butter chips in the freezer and need to use them up.

And they turned out REALLY yummy.


The texture of these is interesting, I am calling them "dough balls" because they didn't set as much as a cookie and had a kind of creamy texture, probably due to the chickpeas. They were definitely cooked all the way through (I actually cooked them almost twice as long as called for), and I loved how soft they were. They didn't fall apart or anything and were browned on the outside. But if you prefer a crunchy cookie treat, you might want to try something else.

One more note, I used one of those "air" baking sheets, which is probably why they took so long to bake. In my experience these types of baking sheets take way longer than traditional rimmed dark baking sheets, so make sure you check on your dough bites after 10 minutes! I would also recommend eating these warm, either fresh from the oven or warmed in the microwave. When the chocolate is melty...mmmm.

As far as I can tell, the recipe originated from the baking blog, Texanerin. Here's my (modified) recipe with the nutritional info!

Chocolate Chip and Peanut Butter Cookie Dough Bites

Prep Time: 8 min
Cook Time: 17 min
Yield: 17 dough bites

1¼ cups canned chickpeas, well-rinsed and patted dry with a paper towel (1 15.5 oz. can)
2 teaspoons vanilla extract
½ cup PB2 (I used half regular, half chocolate)
¼ cup honey
1 teaspoon baking powder
½ cup semi-sweet chocolate chips (I replaced some of the chocolate chips with some peanut butter chips)

Preheat your oven to 350°F. Combine all the ingredients, except for the chocolate chips, in a food processor and process until very smooth. Make sure to scrape the sides and the top to get the little chunks of chickpeas and process again until they're combined.

Stir in the chocolate chips. Using a cookie scoop or wet hands, form into 1½" balls. Place onto a piece of parchment paper. If you want them to look more like normal cookies, press down slightly on the balls. They don't do much rising. Bake for about 17 minutes (10-15 if using a traditional cookie sheet).

Calories: 77 per dough bite (based on 17 servings per recipe)
Fat = 2 g
Protein = 3 g
Sugar = 8 g

Thursday, July 04, 2013

Cupcake MAGIC

Earlier this week, my friend Chris and I took advantage of a Living Social deal and attended a cupcake making class hosted by the founder of Cake Love, Warren Brown.


Come to me, my pretties....

I fancy myself an experienced baker, but I'm always looking to try new recipes and learn some tricks and tips. Especially with cupcakes, which are basically one of the most perfect food items ever invented. It's cake that fits in your hand. What's not to love?

Now I know what you are thinking. "But Maggie, I thought you were on a diet? What are you doing making and eating cupcakes." Here's what I think about that. You can't deprive yourself forever. You have to let yourself indulge every now and again or you will go crazy. Also life is not worth living without cupcakes. Oh, and I did a double workout that day so shut your cupcake hole.

Chris and I arrived at Living Social's building on 918 F Street for the class at 6:30. Turns out they have a pretty sweet kitchen set-up in there, and our baking station was all ready for our arrival with our ingredients for the first recipe (lemon cupcakes--yum!). Warren introduced himself, gave us some background about Cake Love (he quit being a lawyer back in 2000 to follow his dream of opening a bakery which is now celebrating it's 10 year anniversary) . He then did a demo of the recipe, explaining all the steps and providing some interesting information about why we do certain things in a certain order when baking. In his words, "baking is science and art." The science is how the ingredients combine, and the art comes from the baker himself.

And then it was our turn to make the cupcakes! I have to confess, it was WAY easier baking when someone has laid out all the ingredients for you in pre-measured amounts and is waiting to whisk away your dirty dishes and clean them for you. It was like baking on a tv show with assistants to do our every bidding.

As for the results....well, I can't lie. I was skeptical. Like I said, I consider myself an experienced baker. So I wasn't convinced working from the Cake Love recipe was going to make a difference. But holy moly you guys--these lemon cupcakes were possibly the best cupcakes I have ever tasted (I have a particularly strong memory of a Georgetown Cupcake chocolate peppermint cupcake one holiday season). But I am now a convert--this lemon cupcake recipe is amazing! I went ahead and put all the recipes we were provided at the end of the post.


While the lemon cupcakes were baking, it was time to turn to the frosting! Again, I was skeptical. I tend to rely on store frosting since it just seems too time consuming to make my own. And when I heard we were making buttercream I was even more unsure. I tend to go more for the light whipped frostings, and buttercream can be too heavy and too sweet for my tastes.

I was so wrong.

The buttercream recipe we used is a cooked meringue, which basically means you whip egg whites into stiff peaks, add some boiling sugar (which "cooks" the meringue) and then a ton of butter. The whipped egg whites keep the frosting super light and frothy, and the sugar and butter just make it everything delicious. The recipe itself is a bit time consuming since you need to whisk the egg white for a quite a while. And I wouldn't say it's easy--despite the few steps, things need to happen at very specific times for the it to come out correctly. But this is where the science and art come together!


Whip it good!


Now that is a lot of frosting. We made one batch for everyone at our table--which means enough to frost 8 dozen cupcakes. 

Due to the time limitations of the class, we didn't have time to whip the frosting until it had completely cooled. So we cheated a bit by pouring it into huge bowls and popping it in the refrigerator. Then it was time to turn to the chocolate cupcakes! Could they possibly compare to the lemon ones??

The recipe for the chocolate cupcakes is very simple; Warren Brown's baking philosophy is to use natural simple ingredients without any preservatives or shortcuts. And the chocolate cupcakes were total winners--very different from the lemon cupcakes, which had more of a dense texture, the chocolate ones were light and fluffy with an amazing deep chocolatey taste. The coco powder that we used was a higher percentage of coco than your typical powder which I think made a big difference. Warren Brown also recommended switching to using a food scale to measure your dry ingredients (you'll notice that the recipes below often refer to ounces rather than cups). Apparently, this makes for a more exact combination of ingredients.

All in all, the cupcake class was a complete and utter success. Though it was a bit expensive ($39), it was a super fun 3 hours, and we walked home with one dozen cupcakes and two large containers of frosting. Cupcakes like these go for over $3 a pop, so when you think about it like that, we got a good deal with the the fun and instruction added to the mix.


No whisk, bowl, or spatula was left unlicked that day.


Lemon Cupcakes
Yield: One Dozen Cupcakes

1/2 oz. Vegetable shortening (or palm kernal oil)
3 oz. Unsalted butter
10.5 oz. Super fine granulated sugar
1 Lemon (zest and segments)
1 Large egg
2 Small egg yolks
6.25 oz. All-purpose flour
1 tablespoon Cake flour
1/8 teaspoon Baking soda
1/4 teaspoon Salt
4 oz. Sour cream
2 tablespoons Whole milk
1/2 teaspoon Vanilla extract
1/4 teaspoon Dark rum
1 tablespoon Canola oil

1. Preheat oven to 325 degrees.
2. Zest lemon and segment the fruit and combine with all wet ingredients.
3. Cream butter and sugar in the mixer on low speed.
4. Add eggs, a few at a time, until fully combined.
5. Scrape bowl.
6. On low speed, add the dry and wet ingredients alternatively.
7. Turn off the mixer and scrape bowl.
8. Mix on speed 2 for 60 seconds to thoroughly combined all ingredients.
9. Spray cupcake tins with nonstick spray and fill liners.
10. Bake for 20 to 25 minutes.


Cooked Meringue Buttercream

Yield: enough for 12 cupcakes

5 eggs (large)
10 ounces (1 1/4 cups) extra-fine granulated sugar, divided
1/4 cup water
1 pound (4 sticks) unsalted butter, softened

Set out the ingredients and equipment. Separate the eggs and place the whites in the bowl of the standing mixer fitted with a wire whip attachment. Reserve the yolks for another use.

Measure 1 cup of the sugar into a heavy-bottomed 1-quart saucepan with 1/4 cup water. Gently stir to combine; I use the candy thermometer for this. Leave the candy thermometer in the saucepan, numbers facing down to balance the thermometer.

Measure the 1/4 cup sugar into a small bowl and set aside. Cut the butter into tablespoon-size pieces and set aside in a medium bowl.

Begin making the sugar syrup. Place the saucepan with the sugar and water over medium-high heat. Partially cover with a lid to capture the evaporating water -- this helps to moisten the sides of the saucepan to prevent sugar crystals separating from the syrup.

Begin whipping the egg whites to stiff peak in a standing mixer fitted with the wire whip attachment set to high speed. When the whites are at stiff peak you have a meringue. Keep the mixer running and pour the 1/4 cup of sugar into the meringue. Raise the heat to bring the syrup to 245 degrees if it is not there already.

When the syrup is at 245 degrees, remove the thermometer and slowly pour the syrup into the meringue. When pouring, keep your eye on the bowl. Aim for the space between the mixer bowl and the revolving wire whip. To maintain the same rate of pouring, pour slowly and raise the saucepan from your shoulder. Twisting at the wrist or elbow tends to throw off my aim.

After 1 to 2 minutes reduce the speed to medium for about 3 to 4 minutes or until the meringue is cooled. Add the butter one tablespoon at a time. Increase the speed to high for one to two minutes to fully combine the butter with the meringue.


Chocolate Cupcakes
Yield: One dozen cupcakes

3 oz. Butter
7 oz. Sugar
2 Eggs
3.5 oz. All-purpose flour
1 oz. Coco powder
3/4 teaspoon Baking powder
1/2 teaspoon Salt
1/2 cup Milk
2 teaspoon Vanilla extract

1. Combine all the wet ingredients together.
2. Combine all the dry ingredients together.
3. Cream butter and sugar.
4. Add eggs.
5. Alternatively add dry and wet ingredients into mixture.
6. Bake at 350 degrees for 20-25 minutes.

Me, Chris, and Mr. Warren Brown!

Friday, June 28, 2013

Hungry Girl Fettuccini Chick-Fredo

Remember a few weeks ago when I was talking about how I loved all things delicious and creamy? Chicken fettuccine alfredo was pretty much my go-to Italian restaurant choice....that is until I discovered I was lactose intolerant and started dieting. No more alfredo for me.

But I'm not the type of person that gives up easily. So I was determined to find a version of the recipe that would fit in my with low calorie diet AND not contain a ton of cheese that would bother my tummy. A small amount is ok, especially with a Lactaid chaser.

A few months ago, I discovered Hungry Girl. She takes classic recipes (and your favorite comfort foods) and makes lower calorie version using a few key substitutions. Two things that she constantly recommends and uses in her recipes are:

1) House Foods Tofu Shirataki noodles; and,

2) Laughing Cow light spreadable cheese wedges.

The cheese wedges I was familiar with and have enjoyed in the past. At only 35 calories they make a perfect snack accompaniment. Now the noodles? Never heard of them. But Hungry Girl raves about them--apparently they taste like real full carb pasta, but the entire package has only 20 calories.

No, I didn't forget a zero in the above sentence. 20 calories. For the entire package.

But would it really taste like pasta? And can an alfredo substitute that is made with only 1 teaspoon fat-free sour cream, 2 teaspoons grated Parmesan, and a Laughing Cow cheese wedge, really hit the spot??

Well, yes. Yes it can.

Now, let me give you the whole truth here. This is not as creamy or cheesy as a big steaming plate of fettuccine alfredo from a restaurant. Of course it's not, it's diet foot. But does it hit the spot? Absolutely. The noodles are a little more slippery and springy than regular pasta, but honestly? It was delicious, and hello, only 20 calories. I would use this as a pasta substitute every day of the week and twice on Sunday. Literally. I would eat it twice on Sunday no problem.

And the best part? The serving size is listed by Hungry Girl as the "entire recipe." That's right, you get the full package of noodles, 5 ounces of chicken, and a cheese sauce that will fill up your entire plate. There's not going to be sauce dripping off your noodles or anything (it's more like an overall creaminess for the noodles), but it gets the job done and is honestly delicious. If you really can't do without more of a cream feeling, consider adding an extra cheese wedge, which will only add an extra 35 calories to the recipe.

As pictured: 260 calories. Yes, you read that right. This whole big plate of creamy noodles and chicken is only 260 calories. And trust me, that is a big dinner plate. 

Final note, I was a bit worried about locating the noodles since they seem like a specialty item. I was able to find them in the vegan/vegetarian refrigerator case in Wegman's and according to the company website, you can also find them at Wholefoods, or at lots of online food shops.

Bottom line: if you are a pasta fan who is counting calories, FIND THE TOFU NOODLES. Seriously, they will change your life. And the whole recipe is definitely a winner.

Hungry Girl Fettuccine Chick-Fredo (follow the link for a microwave version of the recipe, I cooked it using the stove)

Ingredients

1 package House Foods Tofu Shirataki noodles, Fettuccine Shape
1 wedge The Laughing Cow cheese, Light Original Swiss
2 tsp. fat-free sour cream
2 tsp. reduced fat grated Parmesan cheese
5 oz. skinless chicken breast; grilled with nonstick spray only (I used two chicken tenders)
Optional: salt, pepper, and paprika

Directions

Drain and rinse noodles well. Dry noodles thoroughly (use paper towels to soak up as much moisture as possible) and use a knife or scissors to slice them up a bit. They can be really long, so make sure you cut them!

Spray frying pain with nonstick spray. Salt and pepper chicken, add to pan over medium-high heat and cook for 4 minutes. Flip chicken and cook an additional 4 minutes. Remove chicken from pan and slice into strips.

Respray pan, reduce heat to medium, and add sourcream, parmesan, and cheese wedge. Top with noodles and mix until cheese has melted. Add chicken, mix further, and put on your plate. Enjoy!

Serving Size: Entire recipe
Calories: 259
Fat: 5.75g
Sodium: 472mg
Carbs: 11g
Fiber: 4g
Sugars: 1g
Protein: 39g

 *5 Points!


Monday, June 17, 2013

Cajun Chicken Pasta (on the lighter side)

I love Alfredo sauce. So cheesy. So creamy. It's a perfect companion to pasta dishes, but with my lactose intolerance and dieting, alfredo sauce is a huge giant no-no. But I still miss creamy pasta dishes, so I have been scouring the internet for some alternatives. Sure, I'm never going to be able to recreate the original exactly, but you can't go wrong with a good substitute.

I had such good luck with the blueberry wheat pancakes from SkinnyTaste, I decided to see if she had any creamy pasta sauce recipes. Success! (enter Cajun Chicken Pasta on the Lighter Side, stage left).

This dish has everything delicious: pasta, a creamy sauce, some kick from the cajun seasoning, and protein from the chicken. It's not too difficult (everything cooks in one pan) but I'd rate it as moderate in difficulty since it requires a lot of prep work with the chopping of the veggies, browning of the chicken, and making a slurry (a blended mixture of liquids and solids).

Per usual, I made some changes to the basic recipe. It called for using light cream cheese, but only 3 tablespoons. I couldn't see buying a whole container of the stuff for three measly tablespoons, so I substituted four of the Laughing Cow light spreadable cheese wedges (only 35 calories each!). They're recommended by Hungry Girl and make a really excellent snack along with some low calorie crackers. I also have a pan big enough to cook all the chicken at once, even though the recipe calls for browning it in two batches. Finally, I left out the scallions and mushrooms (yech!), but added some extra tomatoes since I used canned diced tomatoes to save myself some chopping time.

But as you can see, it still turned out awesome!

 I just wanted to stand there and eat it straight out of the pan. 

A few tips if you decide to make it: this is a low calorie sauce, so it's not going to be as thick as a regular alfredo sauce. It will do in a pinch, but don't go in expecting it to be the same. I would recommend leaving it in the pan for about 5 minutes when you are done, it thickens up quickly. Or you could throw in a tablespoon or two of cornstarch and see how that works out. Also, don't be afraid of the cajun seasoning! I think next time, I might even add some hot sauce or chilis to make it even spicier.

I served with my usual spinach salad and Safeway Kitchens cranberry and nut salad topper. You get a pretty large serving with this one (1 1/2 cups) and it makes five servings. Perfect for lunches!

Total calorie count as pictured: 388. Pretty good for a pasta meal!

SkinnyTaste's Cajun Chicken Pasta on the Lighter Side

Servings: 5 • Serving Size: 1 1/2 cups • Old Points: 6 pts • Points+: 8 pts
Calories: 323.8 • Fat: 6.2 g • Protein: 25.9 g • Carb: 44.1 g • Fiber: 6.3 g • Sugar:3.2 g
Sodium: 126.5 mg (without salt)  

Ingredients:

8 ounces uncooked linguine
1 pound chicken breast strips
1-2 tsp Cajun seasoning (or to taste)
1 tbsp olive oil 1 medium red bell pepper, thinly sliced
1 medium yellow bell pepper
Thinly sliced 8 oz fresh mushrooms
Sliced 1/2 red onion
Sliced 3 cloves garlic
Minced 2 medium tomatoes
Diced 1 cup fat free low sodium chicken broth
1/3 cup skim milk
1 tbsp flour
3 tbsp light cream cheese
Fresh cracked pepper
2 scallions chopped
Salt to taste
Smart Balance cooking spray

Directions:

Prep all your vegetables. In a small blender make a slurry by combining milk, flour and cream cheese. Set aside. Season chicken generously with Cajun seasoning, garlic powder and salt.

Prepare pasta in salted water according to package directions.

Heat a large heavy nonstick skillet over medium-high heat; spray with cooking spray and add half of the chicken. Sauté 5 to 6 minutes or until done, set aside on a plate and repeat with the remaining chicken. Set aside. Add olive oil to the skillet and reduce to medium; add bell peppers, onions, and garlic to skillet, sauté 3-4 minutes. Add mushrooms and tomatoes and sauté 3-4 more minutes or until vegetables are tender.

Season with 1/4 tsp salt, garlic powder and fresh cracked pepper to taste. Reduce heat to medium-low; add chicken broth and pour in slurry stirring about 2 minutes. Return chicken to skillet; adjust salt and Cajun seasoning to taste, cook another minute or two until hot, then add linguine; toss well to coat. Top with chopped scallions and enjoy!